Monday, November 21, 2011

How to photograph your Thanksgiving dinner.

You spend hours, and even days, preparing your Thanksgiving feast. Why not take photos that really show off your hard work? Below are some easy tips for taking photos that look good enough to eat!


1. LightingTreat the food you’re photographing as you would any other still life subject and ensure that it is well lit. One of the best places to photograph food is by a window where there is plenty of natural light. This daylight helps to keep the food looking much more natural.


2. Props. Pay attention not only to the arrangement of the food itself but to the context that you put it in, including the plate and any table settings around it. Don’t clutter the photo with a full table setting but consider one or two extra elements such as a glass, fork, flower or napkin. 

3. Be quick. Food doesn’t keep it’s appetizing looks for long, so you’ll need to be well prepared and able to shoot quickly after it’s been cooked before it melts, collapses, wilts or changes color. This means being prepared and knowing what you want to achieve before the food arrives. 

4. Style it. The way food is set out on the plate is as important as the way you photograph it. Pay attention to the balance of food in a shot (color, shapes etc) and utilize common composition rules like leading lines, the rule-of-thirds and repetition. One of the best ways to learn is to get some cook books to see how the pros do it.


5. Enhance it. One tip is to use a little vegetable oil and brush it over food to make it glisten in your shots. Photographing food straight out of the oven while it's still steaming also adds to the appeal. 

6. Get low and close. A mistake that many beginner food photographers make is taking shots that look down on a plate from directly above. While this can work in some circumstances – in most cases you’ll get a better shot by shooting from plate level (or slightly above it). Getting close and really focusing in on just one part of the dish can be an effective way of highlighting the different elements of it.


Monday, October 24, 2011

DIY easy and inexpensive softbox.

I met with a local model recently to discuss an upcoming photoshoot. I'm a natural light photographer, so normally I don't use or want studio lighting of any kind, but this shoot requires it. It's getting too cold out to hold a 3+ hour shoot outdoors. I didn't want to let this opportunity pass me by just because I don't own any professional lighting equipment. So what's a broke photog to do? Well, make your own softboxes, of course!

So I started searching online for a good DIY softbox tutorial and discovered that there's a lot of different ways to do it, 95% of which were confusing, took a lot of time to make and required materials that I didn't already have around the house. I knew there had to be an easier, cheaper way to do it. So here's my step-by-step guide to making your own softbox.

Materials:

  1. large piece of heavy-duty cardboard. (Check out your local hardware/tool store. They usually have large boxes laying around that were used to ship big, heavy objects. I wouldn't recommend using an ordinary cardboard box because you'll be working with it a lot and the slightest bend or rip and your whole project is ruined.)
  2. black duct tape
  3. aluminum foil
  4. glue stick (You'll be using this to stick your foil to the inside of the box. A glue stick works better than regular Elmer's glue. It provides a flatter, less messy finish.)
  5. 100watt CFL light bulb
  6. workshop clamp light (or some sort of lightbulb socket with cord and plug attached. I used a clamp light because I can remove the silver dish and use it later for a DIY beauty dish!)
  7. self-stick velcro (You can find these at any craft store. They're less than $3.00 and come on a long roll.)
  8. large piece of white cotton fabric. (I bought mine for less than $5.00 but you can use any semiopaque white fabric. A t-shirt or an old sheet would work fine.)
  9. box cutter or scissors
  10. ruler or measuring tape
Step 1:
Cut your cardboard box into a rectangular piece approximately 30"x25". My measurements yielded a finished box approximately 23"x25". You can adjust the size of your initial piece accordingly if you want a larger or smaller box.

Step 2:
Draw a rectangle in the center of the cardboard approximately 10"x8". The longer side of the inner rectangle should be parallel to the longer side of the cardboard.

Step 3:
Use your box cutter to create a perforation around the inner rectangle. This will make the folding process much easier. Do not cute all the way through!

Step 4:
Use your box cutter to cut diagonal lines from the corners of the inner rectangle to the corners of the cardboard, like this:

Step 5:
In order to fold the box up to resemble the softbox shape, you'll need to remove a triangle-shaped piece approximately 3 1/2 inches wide from both long sides, like this:

Step 6: Fold the box until the edges meet and secure with duct tape. Like this:
You'll notice a bit of overhang on the top and bottom. This has a purpose I'll show you later. Don't remove it.


Step 7: Cut a 1-2 inch X shape in the center of the inner rectangle. This will form the hole where you will secure the light fixture and bulb. I'm sure there's a much sturdier way to secure the light fixture but I was on a budget, so duct tape worked for me.
This is the view from the back of the box. You can see I positioned the fixture leaving the on/off switch easy to access.

Step 8: Cover the outside of the box with duct tape. This isn't a necessary step, but it does make the box more aesthetically pleasing and adds extra strength
.
Step 9: Remember the extra cardboard that overlapped the top and bottom of the box? These will make your outer frame to hold the fabric. To finish the frame, use scrap cardboard and cut long pieces to fill in the missing side pieces. Use duct tape to secure.

Step 10: Crinkle up large pieces of aluminum foil and re-flatten. The crinkles work better at diffusing the light than flat foil. Secure to the box using the glue stick. Work in small sections at a time so your glue doesn't dry before you get the foil on.

Step 11: Clean up the edges with extra duct tape. Again, this isn't necessary but does make the whole thing look prettier.

Step 12: Cut 12 2-inch pieces of self-stick velcro. Place 3 on each side, evenly spaced, on the outside of the box frame. Placing them on the outside of the frame as opposed to the inside of the frame allows you to stretch the fabric. Placing them on the inside of the box would cause the fabric to sag.

Step 13: Cut a piece of your fabric 1 inch larger on all sides than your box. Place the box on top of the fabric as a guide when securing your velcro to the fabric. Like this:

Step 14: Stretch and secure the fabric to the box. You can clean up the edges of the fabric if you like using scissors or double-sided tape to "hem" the edges, but again, it's not a necessary step.

Voila! You're done! 

This whole project cost me less than $20. Had I already had a clamp light, light bulb and duct tape laying around the house, it would have been free! This was super easy to make and really opens up my photo possibilities. It was definitely worth the time and money spent.

Below are my initial test shots. 
This is my husband, who is incapable of  not making his "blue steel" face whenever  I have my camera pointed at him. I had the softbox about a foot away from him positioned above and to the left of the subject.  
I can't be too mad at him about the "blue steel" face because he's a chef and makes yummy things like this for me!  In this picture the softbox was about 2ft from the plate and only slightly to the left of the camera. You'll notice that moving the softbox back a foot created a softer, all-over light compared to the sharp shadows in the previous photo.

This softbox will work great for close-up portraits, product and food photography. It's a bit too dim for wide shots because it doesn't light much beyond 5ft. If you need a brighter light, I suggest having a look at this DIY Spiderlight. It's more than I care to tackle right now but worth a look if you have the patience and know-how.

I hope you find this article helpful! I'm hoping to start a few other DIY lighting projects soon, including a reflector and ring light. Feel free to share your DIY projects with me in a comment. Good luck!

Monday, October 17, 2011

8 Important Questions To Ask Your Photographer


Hiring a photographer can be stressful. Whether it's for your wedding, family portraits or for an event, you want to be sure the photographer you're hiring will deliver quality photos that you'll treasure forever. There are a lot photographers out there with nice cameras and very little experience trying to take advantage of you. So how do you tell the difference between a professional you can trust, and the other guys? Your first step is to meet and interview them. Here are 8 question that will separate the good from the bad:


1. Can I see your portfolio? This is the easiest way to gauge your potential photographer's skill level. Look at their work. Ask to see specific shots that are of interest to you. A good photographer will have an abundance of examples to show you. Look for things like how they use light, how they pose their subjects, and how they use the location. If they look like snapshots, it's because they are.


2. How would you describe your "style" of photography? Now this doesn't necessarily separate the good from the bad, but it does give you an idea of what to expect. If you're looking for artsy, creative photos, a photographer that describes their style as "classic" may not be the photographer for you. Asking a photographer to do something radically different than what they're used to is a recipe for disaster.

3. What type of camera do you use? This is a good question to ask not because the type of gear they use is important, but because their answer is a good indicator of their skill with it. Do they sound knowledgeable?

4. Do you have backup equipment? Anything can happen during a shoot. Cameras can and do fail. Make sure they have backup equipment that is equivalent to their normal equipment.

5. What kind of experience do you have? A photographer may use the best camera and have an amazing portfolio, but if they have no experience shooting your type of event, hiring them would be a big risk. As with anything in this world, practice makes perfect.

6. Do you have references available? Ask for references and really contact them. Ask them key questions like :

  • Were they on time?
  • Were they prepared?
  • Did any problems arise and how did they deal with them?
  • Were you satisfied with the final photos?
  • Would you hire them again?


7. Do you provide a written contract?
Contracts protect the photographer, their images, and you. A good contract should contain cancellation policies, copyright and reproduction information, client rights, and dispute/arbitration details.


8. Do you have any questions for me? A good photographer will have all kinds of questions for you before the shoot. They should ask you about your expectations and details about the event like location and time of day. If it's a family shoot they should ask about family members and favorite family activities, etc. A photographer that doesn't ask their own questions is not shooting for you, they're shooting for them.


Last but not least, ask yourself if you felt a connection with the photographer and their work. Do they make you feel comfortable and at ease? Use your gut instinct. It rarely leads you in the wrong direction. Good luck!

Sunday, October 9, 2011

How to get the most out of your point and shoot camera.

One of my biggest pet peeves is the assumption that you need an expensive camera to take good photos. I hear it all the time... "I wish I could take nice pictures, but all I have is this stupid point and shoot." Stop blaming the camera. It didn't do anything to you. I'm being silly, of course, but it's true. Anyone with a willingness to learn can take good photos, with any camera. Below are some tricks the pros use to take great photos.


1. Simplify the image. Get closer to your subject. No, a little closer. Little bit closer. There you go! Get rid of all the unnecessary background clutter. The more attention you draw to your subject, the more successful you are in conveying your message to the viewer.

This is an image of my daughter playing in the sand at the beach. By getting closer and eliminating all that background clutter, I've created impact and a much stronger image.


2. Think before you click. Composition and framing. Composition is the way you utilize your surroundings to enhance your subject, and framing is how you place your subject in the frame. There are many different rules of composition that protogs use to make beautiful images. Here's a few of the basic ones:

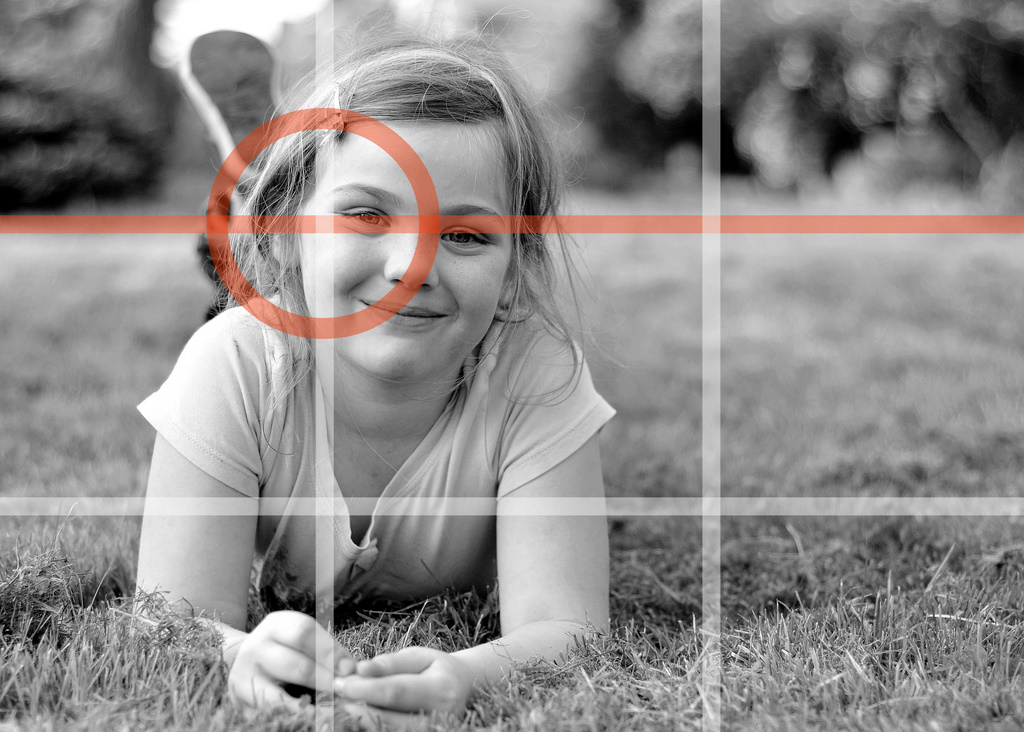
The rule-of-thirds. This is a very useful and easy way to add impact to you photos. It's almost instinct to place your subject dead center in a photo because this is how our brains work. When we look at a flower, for example, our eyes focus first in the center and then outward. It's time to retrain your brain. It's time to start seeing things confined to a rectangular frame consisting of intersecting parallel lines, like this:


The rule-of thirds states that the subject of a photo should be placed where the lines intersect and that any photo comprised of horizontal or vertical lines should follow this grid. For example, the horizon line in a picture of a sunset should either be placed on the bottom third or upper third of the frame. The reason this works and creates impact has something to do with the Fibonacci sequence, but I won't get into that because I don't quite understand it myself. I do pictures, not math. Below is an example of how this rule can be applied to a portrait.

Here's another picture of my daughter. This time she's laying in the grass. I've placed the subject in the general area of where the lines intersect. I've also placed the horizon line in the upper third of the frame. Tada! Impact!

Leading lines. It's all about perception. Leading lines cause the eye to look "into" the image. They are also useful for leading the viewers eye to the subject. Leading lines turn a flat, 2-dimensional image into an almost 3-dimensional image with depth and interest. A lot of things can be utilized to create leading lines.

A fence for instance:
Do you see the rule-of-thirds in this photo?

A road or a path:

Be creative!
The lines created by the mini-blinds lead the eye to the cute puppers!


A frame within a frame. Another way to add impact is to create a frame within the frame using your surroundings. This, again, emphasizes your subject and adds interest.


Be creative when using the "frame within a frame" composition. Try using tree branches to frame a landscape, or use the openings of a chain-link fence, or use a window to frame the view outside. The possibilities are endless and it's a fun way to add interest to your photos.


3. Pay attention to the light. And just say NO to flash! The word "photography" means "the recording of light". It is, in my opinion, the most important part of a good photo. It's also the most difficult aspect to master. I haven't completely mastered it myself and I've been doing this for a long time. While reading this, keep in mind that when I use the word "light", I'm using it in terms of how your subject is illuminated and how it's used to create shadow, texture and interest to your subject. I'm not using it in relation to exposure, which is a completely different subject and one I'll reserve for a separate blog post.

Before taking your photo, look around. Where is the light coming from? It could be the sun, a window, a table lamp, overhead fluorescents or a candle. Know what your light source is and place your subject accordingly. When placing your subject in relation to the light, the main factor to consider is the angle at which the light is hitting your subject. Different angles create different effects.

Back lighting creates silhouettes. Back lighting is great when you want to emphasize shape.

The only light source in this room was a large picture window. By placing  the subject in front of the light source, I created a very nice silhouette of her beautiful belly!
Side lighting is great when you want to emphasize facial features and texture, or when you want to create drama.

The side lighting in this portrait really draws attention to her facial features. Particularly the nose, cheekbones,  and neck. It also adds an element of drama.
The long shadows and texture in this landscape created by side lighting adds dimension to an otherwise flat image.
Front lighting is great for when you want an all-over, evenly lit subject.

This is actually a picture of me (hi!) lit from the front using a large window.  There are no defined shadows, just bright and even light. 

Now let's talk about how NOT to light your subject. First and foremost, turn off the flash! The flash that comes with your camera is harsh, causes red-eye, creates awful shadows behind you, and just isn't powerful enough to light anything more than 5 or 10 ft. away. It's all bad. Instead, utilize alternative light sources. Windows are my favorite. They distribute and diffuse the light in a way that is flattering and soft. If you're outside, use that great big light bulb in the sky! However, it must be noted that the light provided by the high, mid-day sun causes unflattering shadows on the face and squinty, raccoon eyes. Yuck! If you are taking photos during the afternoon, find some shade. This will eliminate the harshness but still provide ambient light.


Have I confused you yet? Light is a hard concept to grasp and it's one that requires a lot of experimentation and failed attempts to get it just right. The next time you're bored, grab your camera and play around with different light sources. It's actually fun, I promise!


4. Take advantage of what your camera CAN do. Point and shoot cameras today have all kinds of useful functions that make taking great photos easier than ever. Read your camera's manual front to back. Chances are good that it has functions you weren't even aware of. Learn how to take advantage of things like facial recognition, macro mode, portrait mode, exposure bracketing, image stabilization, smart focus, intelligent ISO, etc etc etc. I could talk about all of the features on your camera, but I'd just be re-writing the manual you already have in front of you. A photographer who knows how their camera works knows how to make it work for them.

5. Stop leaving your camera at home. The best part of owning a point and shoot is the ability to take it with you everywhere. You have an advantage over DSLR owners in that aspect. My camera stays at home most of the time because it's quite obtrusive. When you add on assorted lenses and flashes, my bag of camera gear can weigh 10lbs. or more. It's not the most convenient way to travel. I've missed hundreds of photo opportunities because I left my camera at home. So, stop missing the opportunities! A fantastic photo could be right around the corner!


Last but not least, I want you to remember that there's nothing inadequate about your point and shoot camera. Photography has absolutely nothing to do with the camera and everything to do with who's behind it. I hope you've found these tips helpful and I hope you share your point and shoot photos with me in a comment!